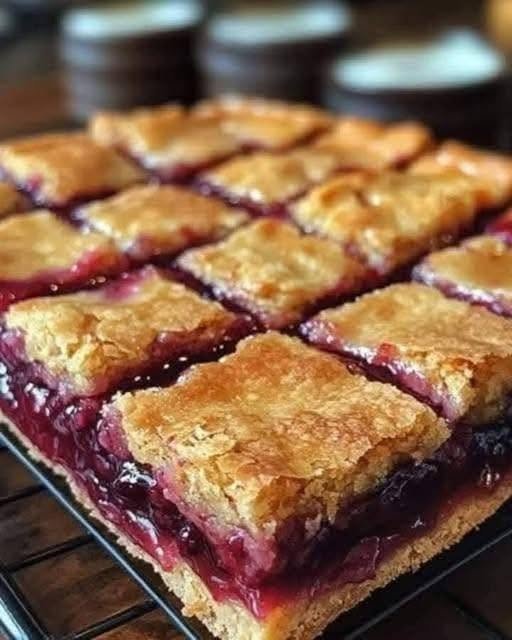
Cherry Pie Bars
If you adore the comforting, nostalgic warmth of a classic homemade cherry pie but despise the tedious, multi-step process of rolling out fussy pie crusts, building lattice tops, and waiting hours for a whole pie to cool and set, Cherry Pie Bars are your ultimate baking solution. This recipe delivers everything you love about traditional cherry pie—a buttery, tender shortbread crust, a bright, tart-sweet ruby-red cherry filling, and a golden, crumbly streusel or lattice topping—all packed into a convenient, handheld square that cuts cleanly and serves effortlessly.
Whether you are baking for a summer holiday barbecue, putting together a bake-sale crowd-pleaser, or simply satisfying a cozy weekend dessert craving, these bars hit every single note of perfection. Let’s explore everything you need to know to master Cherry Pie Bars from scratch.
Nutritional Profile and Macro Overview
While traditional bakery sweets are often heavy on artificial additives and empty calories, crafting these bars at home allows you to control your ingredients and balance your treats. While they remain a decadent dessert, portioning them into clean squares helps manage your intake effortlessly.
-
Calories: ~280 to 340 kcal per square bar
-
Protein: 3g to 5g
-
Carbohydrates: 42g to 52g (sourced from wholesome flour, oats, and real fruit)
-
Fats: 12g to 16g (rich, satisfying butter fats that create a melt-in-your-mouth shortbread texture)
Ingredients List
To achieve an exquisite balance of buttery shortbread texture and luscious fruit filling, ingredient quality is paramount. This recipe yields 16 generous square bars (baked in a standard 9×13-inch baking pan).
1. The Shortbread Crust & Streusel Topping
-
Unsalted Butter: 1 cup (2 sticks), softened to room temperature. (Using unsalted butter lets you control the salinity precisely).
-
Granulated White Sugar: 3/4 cup.
-
Pure Vanilla Extract: 2 teaspoons.
-
Large Egg: 1 whole egg (binds the crust mixture together nicely).
-
All-Purpose Flour: 2.5 cups.
-
Rolled Oats: 1 cup (adds a wonderful rustic, chewy texture to the crumble topping).
-
Baking Powder: 1/2 teaspoon.
-
Salt: 1/2 teaspoon.
2. The Cherry Pie Filling
-
Cherry Pie Filling: Two 21-ounce cans of high-quality cherry pie filling (or approximately 4 cups of homemade stovetop cherry compote made from tart cherries, sugar, and cornstarch).
-
Fresh Lemon Juice: 1 tablespoon. (Stirring a splash of lemon juice into canned filling brightens the flavor profile and cuts through the intense sweetness).
-
Almond Extract: 1/2 teaspoon. Secret ingredient alert: Cherry and almond are a legendary flavor pairing; a tiny splash of almond extract elevates the fruit filling from standard to bakery-quality.
Step-by-Step Cooking Instructions
Step 1: Prep the Oven and Pan
-
Preheat your oven to 350°F (175°C).
-
Line a 9×13-inch baking pan with parchment paper, leaving a couple of inches hanging over the edges. This acts as a “sling” that allows you to lift the entire batch of bars out cleanly once cooled, making slicing effortless. Lightly grease the parchment with cooking spray.
Step 2: Mix the Buttery Shortbread Dough
-
In a large mixing bowl or a stand mixer fitted with the paddle attachment, beat the 1 cup of softened unsalted butter and 3/4 cup of granulated sugar on medium speed for 2 to 3 minutes until light, fluffy, and creamy.
-
Add the 2 teaspoons of pure vanilla extract and the whole egg. Beat for another minute until fully incorporated.
-
In a separate medium bowl, whisk together your 2.5 cups of all-purpose flour, 1 cup of rolled oats, 1/2 teaspoon of baking powder, and 1/2 teaspoon of salt.
-
Gradually add the dry flour-oat mixture into the wet butter mixture on low speed, mixing just until combined and a crumbly dough forms. Do not overmix, or your shortbread crust will lose its tender crumb.
Step 3: Layer the Crust and Bake the Base
-
Reserve about 1.5 cups of the shortbread-oat mixture and set it aside in a separate bowl (this will become your crumbly topping later).
-
Take the remaining bulk of the dough and dump it into your prepared 9×13-inch baking pan.
-
Using your fingers or the flat bottom of a measuring cup, press the dough firmly and evenly across the bottom of the pan to create a solid, compact crust layer.
-
Bake this base crust in the preheated oven at 350°F for 15 to 18 minutes, or until the edges are lightly golden and the center is set. Remove from the oven but leave the oven on.
Step 4: Prepare and Add the Cherry Filling
-
While the crust is baking, empty your two cans of cherry pie filling into a mixing bowl.
-
Stir in the 1 tablespoon of fresh lemon juice and the 1/2 teaspoon of almond extract.
-
Pour the prepared cherry filling evenly over your hot, partially baked shortbread crust, spreading the cherries and their thick sauce into an even layer with a spatula.
Step 5: Add the Crumble Topping and Bake
-
Take your reserved 1.5 cups of shortbread-oat dough and squeeze small handfuls of it between your fingers to create coarse clumps, scattering them evenly across the top of the cherry layer.
-
Return the baking pan to the oven and bake at 350°F for 30 to 35 minutes, or until the crumb topping is deeply golden-brown and the cherry filling is bubbling merrily around the edges.
Step 6: Cool, Chill, and Slice
-
Remove the pan from the oven and place it on a wire cooling rack.
-
Crucial Step: Allow the bars to cool completely at room temperature (about 1 to 2 hours), then place the pan in the refrigerator for at least 1 hour. Cutting into warm cherry bars will cause them to collapse and ooze everywhere; chilling allows the fruit filling and butter crust to set into clean, professional squares.
-
Use the parchment paper sling to lift the entire block out of the pan and onto a cutting board. Slice into 16 clean squares with a sharp knife, serve, and enjoy!
Pro-Tips for Culinary Success
-
The Parchment Sling Trick: Never skip lining your pan with parchment paper. Because fruit fillings can become sticky when baked, this technique guarantees your bars lift out cleanly without breaking apart.
-
Enhancing Canned Filling: Elevating store-bought cherry pie filling with a splash of fresh lemon juice and almond extract transforms a standard baking shortcut into a rich, complex dessert that tastes entirely homemade.
-
Storage and Freezing: These bars store wonderfully in an airtight container in the refrigerator for up to 5 days. You can also freeze them individually wrapped in parchment paper for up to 2 months, making them an incredible make-ahead treat for future hosting events!
