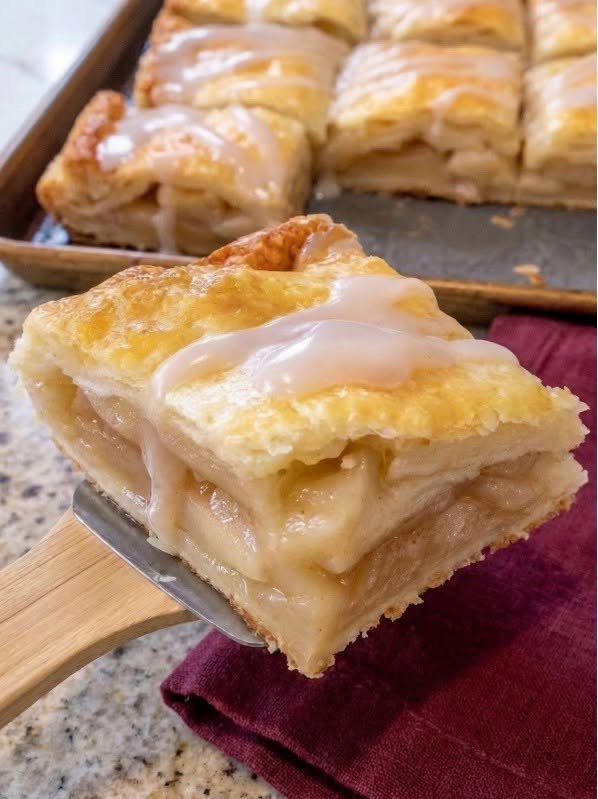
If you grew up going to neighborhood bakeries around Chicago, you know exacty what an Apple Slice is: it’s not quite a pie, not a standard bar, and not a slab pie—it’s a massive, sheet-pan apple pastry baked with a double crust, topped with a signature sweet vanilla butter glaze, and cut into neat, portable squares.
Here is how to recreate that nostalgic, old-school Chicago bakery favorite at home!
Ingredients
-
The Crust:
-
4 cups all-purpose flour
-
1 tbsp granulated sugar
-
1 tsp salt
-
1 ¼ cups (2 ½ sticks) unsalted butter, chilled and cut into cubes (or grated) [Traditional Chicago bakeries often used quality lard or a butter-lard blend for ultimate flaky crispness, but cold butter works wonderfully]
-
½ cup to ⅔ cup ice water
-
-
The Apple Filling:
-
4 cups thick apple pie filling (You can use 2 cans of a high-quality store-bought filling, or make your own by simmering about 3 lbs of peeled, sliced Granny Smith/Honeycrisp apples with ¾ cup sugar, 2 tbsp cornstarch, 1 tsp cinnamon, and ¼ cup water until tender).
-
-
The Bakery Vanilla Glaze:
-
1 cup powdered sugar
-
2 tbsp unsalted butter, softened
-
1 tsp pure vanilla extract
-
2 to 3 tbsp whole milk
-
Instructions
1. Make the Pastry Dough
-
In a large bowl, whisk together the flour, sugar, and salt.
-
Cut or grate the cold butter into the flour mixture using a pastry blender or your fingers until it resembles coarse crumbs with pea-sized pieces of butter left over.
-
Drizzle in the ice water a little at a time, tossing with a fork until the dough just comes together.
-
Divide the dough in half, shape each half into a flat rectangle, wrap in plastic wrap, and chill in the refrigerator for at least 30 minutes.
2. Assemble the Sheet-Pan Pastry
-
Preheat your oven to 400°F (200°C) and lightly grease a standard 9×13-inch jelly roll pan (or rimmed baking sheet).
-
Roll out the first rectangle of chilled dough on a floured surface to fit the bottom of your pan. Press it evenly into the bottom and slightly up the sides.
-
Spread your apple pie filling in an even layer right over the bottom crust.
-
Roll out the second piece of dough and lay it directly over the apples. Pinch or fold the edges together to seal (it doesn’t have to look overly fancy or crimped—classic bakery slices are rustic!).
-
Using a sharp knife, cut 3 or 4 small slits into the top crust to allow steam to escape.
3. Bake
-
Bake at 400°F for 35 to 40 minutes, rotating the pan halfway through, until the pastry crust is deeply golden brown and crisp.
-
Remove from the oven and let it cool completely on a wire rack. (Crucial step: If the pastry is still warm when you glaze it, the icing will melt right off!)
4. Mix and Spread the Glaze
-
In a small bowl, whisk together the powdered sugar, softened butter, vanilla extract, and milk until completely smooth and spreadable.
-
Using an offset spatula, spread an even layer of the glaze all over the cooled top crust. Let it sit for 10–15 minutes until the icing sets and forms a light crust.
5. Slice and Serve
-
Cut the sheet into generous squares (traditionally 12 large bakery-sized squares or up to 24 smaller bite-sized pieces). Enjoy with a cup of coffee!
Pro-Tip for Success
-
The Glaze is King: The defining characteristic of a classic Chicago bakery apple slice is that thick, sweet, buttery vanilla icing layer on top that hardens slightly as it sets. Don’t skimp on letting the pastry cool so the glaze stays opaque and rich on top!
