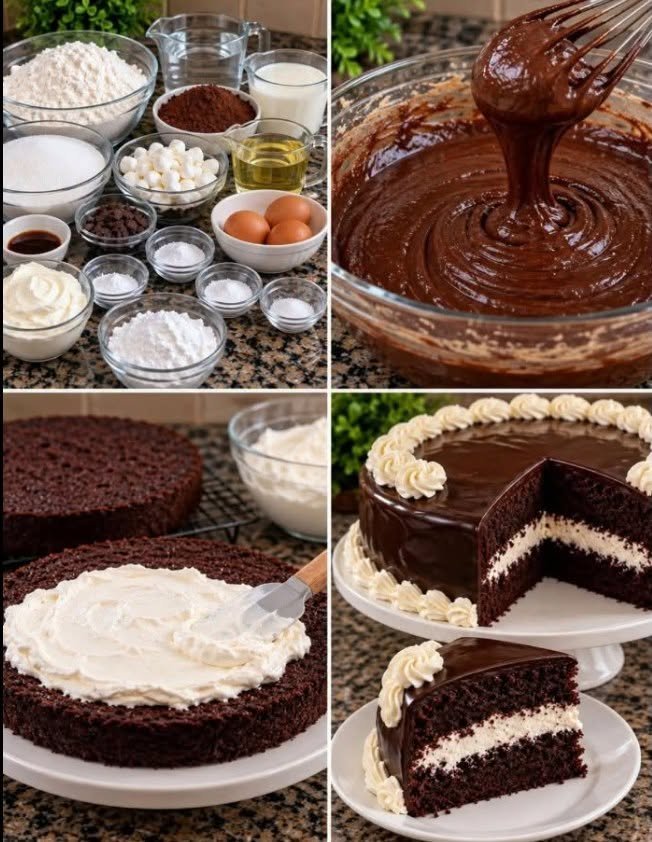
A Pingüino-style chocolate cake (inspired by the iconic Marinela Pingüinos—or classic Hostess-style chocolate cupcakes / Ding Dongs) is the ultimate nostalgic treat. It features an ultra-moist, deep-dark chocolate cake, a luscious sweet marshmallow-cream center, a smooth chocolate glaze coating, and the signature white loop design piped right on top.
You can bake this as a batch of cupcakes or as a full-sized 9-inch layer cake. Here is how to make the ultimate Pingüino Chocolate Cake (Cupcake or Layer Cake style) at home!
Ingredients
-
The Deep Chocolate Cake Base:
-
1 ¾ cups all-purpose flour
-
1 ¾ cups granulated sugar
-
¾ cup unsweetened cocoa powder
-
1 ½ tsp baking soda
-
¾ tsp baking powder
-
1 tsp salt
-
2 large eggs (at room temperature)
-
1 cup whole milk or buttermilk
-
½ cup vegetable oil or canola oil
-
1 tsp pure vanilla extract
-
1 cup boiling water or hot coffee (The secret to making oil-based chocolate cakes extraordinarily moist and rich!)
-
-
The Marshmallow-Cream Filling:
-
½ cup (1 stick) unsalted butter, softened to room temperature
-
1 cup powdered confectioner’s sugar
-
7 oz jar marshmallow creme (fluff)
-
1 tsp pure vanilla extract
-
-
The Chocolate Glaze / Ganache Topping:
-
8 oz semi-sweet chocolate baking bars or high-quality chocolate chips
-
⅔ cup heavy whipping cream
-
-
The Signature White Loop Icing:
-
2 tbsp unsalted butter, softened
-
¾ cup powdered sugar
-
1 to 2 tsp milk
-
¼ tsp vanilla extract
-
Instructions
1. Bake the Chocolate Cake
-
Preheat your oven to 350°F (175°C). Grease two 9-inch round cake pans (or line two muffin tins with paper liners if making cupcakes).
-
In a large mixing bowl, whisk together the flour, sugar, cocoa powder, baking soda, baking powder, and salt.
-
Add the eggs, milk, oil, and vanilla extract. Beat on medium speed for about 2 minutes until smooth.
-
Carefully pour in the boiling water (or hot coffee) while mixing on low speed. (Don’t panic—the batter will look very thin and watery, but this is exacty how it should be to yield a melt-in-your-mouth crumb!)
-
Divide the batter evenly into your pans. Bake for 30 to 35 minutes for round cakes (or 18 to 20 minutes for cupcakes), until a toothpick inserted into the center comes out clean.
-
Let the cakes cool completely on a wire rack.
2. Make the Marshmallow Filling
-
In a mixing bowl, beat the softened butter on high speed for 2 minutes until creamy.
-
Turn the mixer to low and gradually add the powdered sugar until smooth.
-
Fold in the entire jar of marshmallow fluff and the vanilla extract. Whip on medium speed for another 1 to 2 minutes until light, fluffy, and pillowy. Set aside.
3. Make the Chocolate Ganache Topping
-
Place the chopped chocolate (or chips) into a heat-safe bowl.
-
Heat the heavy cream in a small pot or microwave until it is just about to simmer (do not boil). Pour the warm cream directly over the chocolate.
-
Let it sit undisturbed for 2 minutes, then whisk smoothly from the center outward until a glossy, thick chocolate ganache forms. Let it cool slightly until it reaches a spreadable/pourable consistency.
4. Assembly (Filling and Coating)
-
If making a Layer Cake: Place your first cooled cake layer down. Pipe a thick dam of ganache around the outer edge (to act as a wall), then scoop and spread your marshmallow filling generously inside it. Top with the second cake layer.
-
If making Cupcakes: Use a apple corer or small knife to scoop out a core from the center of each cupcake. Pipe or spoon the marshmallow filling inside, then place a small piece of the cut-out cake back on top to seal it.
-
Pour or spread the smooth chocolate ganache evenly over the top of the cake (or dip the tops of the cupcakes directly into the warm ganache). Let it set in the fridge for 15 minutes.
5. Add the Signature White Loops
-
While the chocolate coating is setting, mix together the 2 tablespoons of softened butter, powdered sugar, milk, and vanilla extract until a smooth, pipeable white icing forms.
-
Transfer the white icing to a small piping bag (or a ziplock bag with a tiny corner snipped off).
-
Pipe the signature Pingüino continuous spiral loops across the top of the cake (or zigzag parallel loops across each individual cupcake).
6. Chill and Serve
-
Pop the finished cake into the refrigerator for at least 30 minutes to let the ganache and filling firm up completely. Slice and enjoy your homemade, bakery-quality Pingüino cake!
Pro-Tips for Success
-
The Coffee Boost: Using hot coffee instead of plain boiling water doesn’t make the cake taste like coffee; it acts as a flavor enhancer that makes the chocolate taste exponentially deeper and richer.
-
Storage: Keep this cake stored in an airtight container in the refrigerator because of the dairy- and marshmallow-based filling. It tastes even better on day two as the chocolate cake absorbs the marshmallow moisture!
