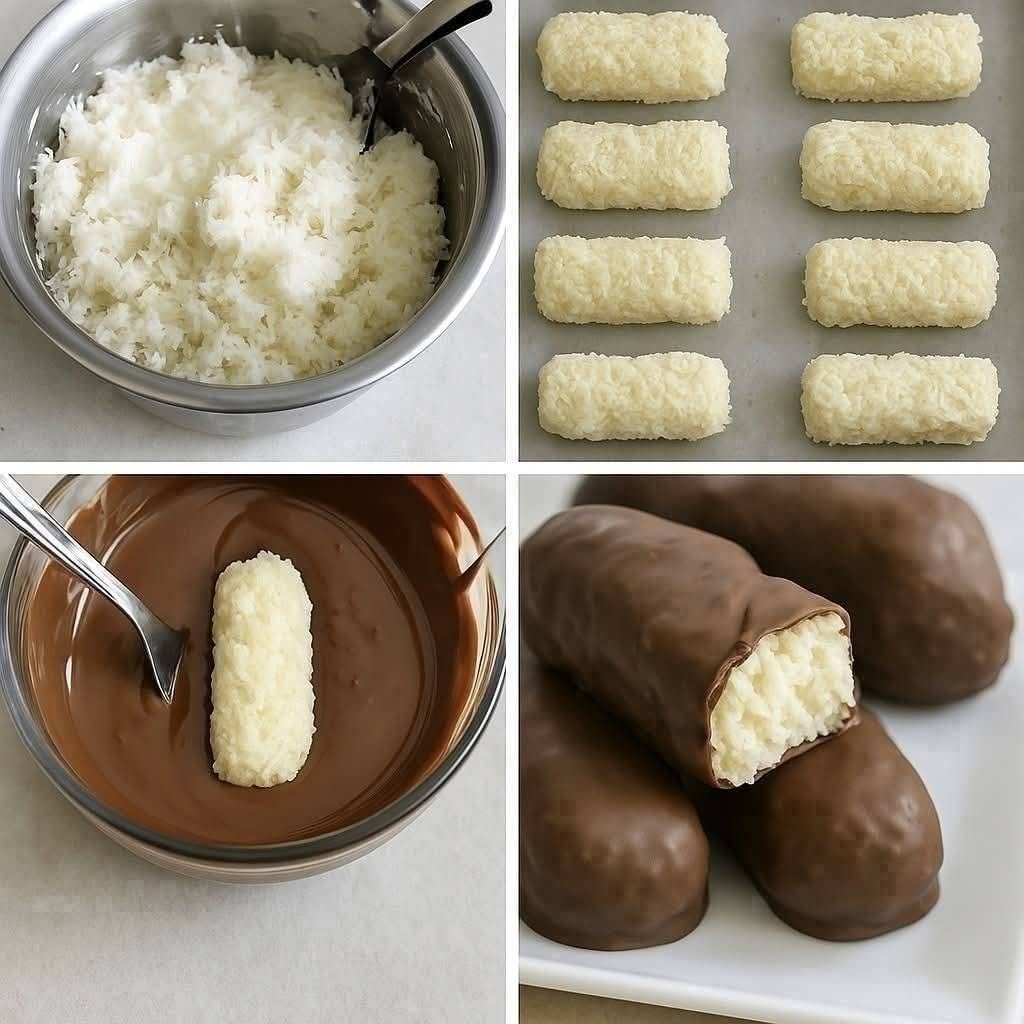
Low-Carb Coconut Chocolate Bites
If you are following a ketogenic, low-carb, or sugar-conscious lifestyle, finding a dessert or midday snack that genuinely satisfies a sweet tooth without triggering a stubborn blood sugar spike can feel like an impossible quest. Enter Low-Carb Coconut Chocolate Bites. These bite-sized confections capture the ultimate tropical-meets-indulgent flavor pairing—rich, dark, antioxidant-dense chocolate coupled with sweet, chewy, fiber-rich coconut flakes—all while keeping carbohydrates to an absolute minimum. They require zero baking, come together in just a few minutes of active kitchen prep, and taste so decadent that you will genuinely forget they are completely sugar-free and keto-friendly.
Whether you are deep into a fat-loss cutting phase, managing metabolic health, or simply searching for an effortless, meal-prepped treat to keep in your freezer for emergency sugar cravings, this recipe is guaranteed to become a permanent fixture in your culinary rotation. Let’s explore everything you need to know to master these macro-friendly coconut chocolate bites from scratch.
Nutritional Profile and Macro Overview
Traditional candy bars and coconut-chocolate confections are notoriously loaded with refined sugars, high-fructose corn syrup, and hidden carbs that derail metabolic progress instantly. By swapping refined sugars for natural, zero-calorie sugar alternatives like erythritol, monk fruit, or allulose, and utilizing high-fat, high-fiber coconut, this recipe transforms a classic indulgence into a functional, low-carb energy booster.
-
Calories: ~85 to 110 kcal per individual bite
-
Protein: 1g to 2g
-
Carbohydrates: 2g to 4g net carbs per bite (heavily offset by dietary fiber from the coconut)
-
Fats: 8g to 11g (healthy medium-chain triglycerides [MCTs] from coconut oil and coconut flakes that promote sustained cognitive clarity and prolonged satiety)
Ingredients List
To achieve an authentic candy-bar texture and a rich, velvety chocolate shell without introducing hidden sugars, ingredient selection is crucial. This recipe yields 12 to 15 bite-sized pieces.
1. The Coconut Filling Core
-
Unsweetened Shredded or Flaked Coconut: 2 cups. (Ensure you purchase unsweetened coconut flakes; sweetened varieties are packed with hundreds of hidden grams of sugar).
-
Coconut Oil: 3 tablespoons, melted. (Virgin unrefined coconut oil will impart a pleasant, natural tropical aroma, while refined coconut oil offers a neutral flavor profile).
-
Unsweetened Canned Coconut Milk or Heavy Cream: 2 tablespoons. This provides the necessary liquid moisture to bind the coconut flakes together into a cohesive, moldable mixture.
-
Powdered Monk Fruit or Erythritol Sweetener: 3 tablespoons. (Using a powdered sweetener is essential; granular sweeteners will leave a gritty, unpleasant texture in your mouth).
-
Pure Vanilla Extract: 1 teaspoon. A generous dose of vanilla enhances the natural sweetness and depth of the coconut.
-
A Pinch of Sea Salt: 1/4 teaspoon. Salt is a non-negotiable flavor enhancer that cuts through the sweetness and elevates the rich coconut notes.
2. The Chocolate Coating Shell
-
Sugar-Free Dark Chocolate Chips or Chopped Baking Bar: 1 cup (brands like Lily’s or ChocZero work exceptionally well).
-
Coconut Oil: 1 teaspoon (added directly into the melting chocolate to create a smooth, glossy shell that hardens with a satisfying snap).
Step-by-Step Cooking Instructions
Step 1: Mix and Shape the Coconut Filling
-
In a large mixing bowl, combine your 2 cups of unsweetened shredded coconut flakes, powdered monk fruit (or erythritol), and sea salt. Toss everything together with a fork or spatula to ensure the sweetener is evenly distributed among the flakes.
-
Pour in the 3 tablespoons of melted coconut oil, 2 tablespoons of unsweetened coconut milk (or heavy cream), and the pure vanilla extract.
-
Mix thoroughly until the coconut flakes are completely moistened and begin to stick together. Take a small handful of the mixture and squeeze it tightly in your palm; if it holds its shape without crumbling apart, it is ready. (If it feels too dry, add an extra half-teaspoon of coconut milk).
-
Line a baking sheet or large plate with parchment paper. Using a small cookie scoop or your hands, pack the coconut mixture tightly into firm little mounds, logs, or balls.
-
Place the formed coconut bites onto the parchment-lined sheet and transfer them to the freezer for 20 to 30 minutes to firm up completely before the chocolate coating stage.
Step 2: Melt the Sugar-Free Chocolate Shell
-
While your coconut centers are chilling in the freezer, prepare your chocolate coating.
-
Place your sugar-free dark chocolate chips (or chopped baking bar) into a microwave-safe glass bowl along with 1 teaspoon of coconut oil (the oil thins the chocolate slightly, making it much easier to dip).
-
Microwave in 30-second intervals, stirring vigorously after each interval with a dry spatula, until the chocolate is completely melted, smooth, and glossy. Do not overheat, or the chocolate will seize and become grainy. Allow it to cool slightly for 2 minutes.
Step 3: Coat and Enrobe the Coconut Bites
-
Remove your chilled coconut centers from the freezer. They should now be firm and easy to handle without breaking apart.
-
Drop one coconut bite into the warm melted chocolate. Use a fork or spoon to roll it around quickly until it is completely enrobed in chocolate.
-
Lift the coated bite out of the chocolate using a fork, gently tapping the fork against the edge of the bowl to let any excess chocolate drip back down.
-
Carefully slide the chocolate-covered coconut bite back onto your parchment-lined baking sheet. Repeat the process for the remaining coconut centers.
-
(Optional garnish): While the chocolate coating is still wet, sprinkle a tiny pinch of flaked sea salt or a small dusting of leftover unsweetened coconut flakes right over the top of each bite.
Step 4: Final Chill and Storage
-
Return the finished tray of chocolate-coated coconut bites back into the refrigerator or freezer for 15 minutes to allow the chocolate shell to harden completely into a crisp, snap-ready finish.
-
Once set, transfer the bites into an airtight container. Store them in the refrigerator for up to 2 weeks, or keep them stored long-term in the freezer for up to 2 months for a satisfying, ice-cold treat straight from the cold storage!
Pro-Tips for Culinary Success
-
Sweetener Selection Matters: Always utilize a powdered sugar substitute for this recipe. Granular sweeteners will not dissolve into the cold coconut mixture properly, resulting in an unpleasant, crunchy mouthfeel that ruins the smooth texture of the bite.
-
Preventing Chocolate Seizing: Ensure that absolutely no water or moisture comes into contact with your melting chocolate. Even a single drop of water can cause sugar-free chocolate to instantly seize into a thick, unmanageable clump.
-
Portion Control & Satiety: Because these bites are packed with healthy fats and fiber from the coconut, they are remarkably satiating. Just one or two of these treats alongside a cup of black coffee or afternoon tea is usually more than enough to completely conquer a sweet craving without any blood sugar turbulence.
